What You’ll Need to Build a Diecast Car (Materials & Tools)
Building your own custom diecast car is a rewarding hobby that combines creativity with craftsmanship. It’s a fantastic way to personalize your collection and learn new skills. Before you begin, gather your supplies and prepare your workspace. This guide will take you through every step, from selecting the right diecast car to applying the finishing touches. With the right tools and a bit of patience, you can transform a simple diecast model into a unique piece of art. This ultimate guide will help you every step of the way to create a perfect diecast car.
Essential Tools for Diecast Car Building
Having the right tools is crucial for a successful diecast car build. You’ll need a set of precision screwdrivers (Phillips head and flathead) in various sizes to disassemble the car. A hobby knife or X-Acto knife is essential for trimming parts and removing decals. Small files and sandpaper of different grits will help smooth surfaces and prepare them for painting. Tweezers are invaluable for handling small parts. Additionally, you’ll need a well-ventilated workspace, especially when painting. Safety glasses and a dust mask are also recommended to protect yourself from fumes and particles. Don’t forget to get some adhesive of various type (epoxy, superglue, etc.).
Preparing the Diecast Car for Customization

Preparation is key to a professional-looking diecast car. Begin by selecting a diecast model you like. Consider the model’s details, such as the level of detailing and the number of parts. Inspect the model for any imperfections or damage. Next, carefully disassemble the car. This usually involves removing screws, wheels, and any additional accessories. Take pictures of the car before disassembling it to help you remember how the parts fit together during reassembly. This step is critical; if you skip it, you may not be able to reassemble the car properly. Prepare yourself, because sometimes screws are hard to reach.
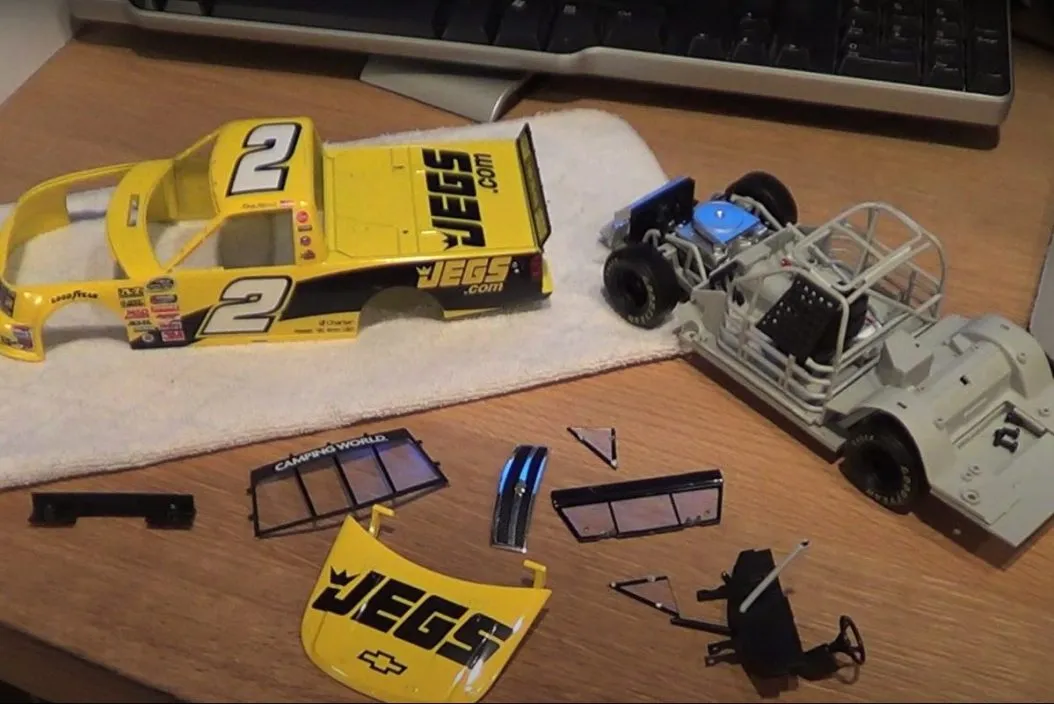
Disassembling Your Diecast Car
Carefully disassemble your diecast car, working methodically to keep track of all the small parts. Use the precision screwdrivers to remove all screws, and place them in a small container to prevent them from getting lost. Gently pry apart any glued-on components, such as the interior or windows, using a hobby knife if needed. Take your time and avoid forcing any parts, as this could damage them. Make notes on how parts fit together, or take photos during the process. Sort all of the pieces after removing the components. This makes the reassembly easier. Once the car is completely disassembled, you’re ready to move on to the next step: removing the old paint and prepping the body for a fresh coat. If you can, avoid scratching or otherwise harming the car parts.
Removing the Paint
Removing the old paint is a critical step if you want to repaint your diecast car. There are several methods to choose from. Chemical paint strippers are effective but require careful handling and proper ventilation. Follow the manufacturer’s instructions and wear gloves and eye protection. Alternatively, you can use a baking soda blasting method, which is a less aggressive method. After removing the paint, use fine-grit sandpaper to smooth the surface and remove any remaining residue. Ensure the surface is completely clean before applying the new paint. This is the only way to ensure that your work is professional and beautiful.
Cleaning the Car Body
Once the paint has been removed, thoroughly clean the car body. Use a mild dish soap and water to remove any remaining paint residue, grease, or dirt. Rinse the body thoroughly and dry it completely with a clean cloth. Inspect the body for any imperfections or scratches. Use fine-grit sandpaper to smooth out any flaws and create a perfect surface for painting. Pay close attention to all the small details and crevices, ensuring they are free of any debris. This meticulous cleaning is important for excellent paint adhesion. By cleaning the car body, the paint can settle in and do not create imperfections.
Painting Your Diecast Car
Painting is where your diecast car truly comes to life. Choosing the right paint and applying it correctly is essential for a professional finish. There are many different types of paints and methods you can use, and we will cover them in the following sections. Remember to work in a well-ventilated area and take your time. This stage will take patience and a steady hand. The work you do during the painting stage can determine the look and quality of your finished model.
Choosing the Right Paint Type
For diecast cars, acrylic lacquers or enamel paints are popular choices. Acrylic lacquers dry quickly and provide a smooth finish, making them ideal for beginners. Enamel paints offer excellent durability and a glossy finish but require more time to dry. Consider the color options, durability, and the ease of application when choosing. Automotive paints designed for model cars offer a wide range of colors and finishes. Always test the paint on a small, inconspicuous area before applying it to the entire model. The selection of paint is not just a matter of color; it is important to know which properties the paint has.
Preparing the Surface for Painting

Before painting, thoroughly prepare the surface of your diecast car. Use fine-grit sandpaper (around 400-600 grit) to lightly sand the body. This creates a slightly rough surface that helps the paint adhere properly. Clean the surface to remove any dust or debris. Apply a primer coat to the body to improve paint adhesion and ensure a uniform finish. Allow the primer to dry completely before applying the color coats. Proper surface preparation is essential for a smooth, professional-looking paint job. Avoid touching the surface with your bare hands.
Applying the Paint
When applying paint, several thin coats are better than one thick coat. Hold the spray can or airbrush at a consistent distance from the model and apply the paint in even strokes. Let each coat dry completely before applying the next one. This prevents runs and drips, resulting in a smoother finish. For best results, use an airbrush. Once the paint is completely dry, you can apply a clear coat to protect the finish and give it a glossy appearance. Consider applying multiple thin coats. This can have a tremendous impact on the appearance of the final product.
Adding Details & Finishing Touches
Once the paint has dried, it’s time to add details and finishing touches. This is where you can add realism and personality to your diecast car. This part is where you can truly get creative, adding custom details like racing stripes, company logos, or even changing the color of the interior. The finishing touches are important to truly make your car one-of-a-kind. Here, you have the freedom to express yourself and create a car that you are proud to display.
Decals and Graphics

Decals and graphics can add significant detail and realism to your diecast car. Carefully apply decals using tweezers and a hobby knife. Use decal setting solutions to help the decals conform to the contours of the car body. This prevents silvering and ensures the decals blend seamlessly with the paint. Consider customizing decals to add personal touches. Apply a clear coat over the decals to protect them from damage. After applying the decal, you can create a great and professional looking final product.
Wheels and Tires
Wheels and tires can greatly affect the look of your diecast car. Replace the stock wheels with custom wheels and tires to give your car a unique appearance. You can find a wide range of aftermarket wheels and tires for diecast models. If necessary, you can paint or weather the wheels to match your desired aesthetic. Ensure the wheels fit properly and rotate freely. This can make a big difference in the overall aesthetic of your custom diecast car.
Reassembling Your Diecast Car
Once all the painting and detailing are complete, it’s time to reassemble your diecast car. Carefully put the car back together, following the disassembly steps in reverse. Refer to the photos you took earlier to make sure you place everything in the right place. Ensure all parts fit snugly and secure them with screws or glue. Take your time to avoid damaging the newly painted surfaces. Do not hurry! Reassembly is just as important as any other stage. Once reassembled, your custom diecast car is ready for display.
Displaying and Preserving Your Custom Diecast Car

Displaying and preserving your custom diecast car is essential to protect your hard work. Consider using a display case to protect the car from dust and damage. Position the case away from direct sunlight to prevent fading. Clean the car regularly with a soft cloth. Handle the car with care, and avoid touching the painted surfaces unnecessarily. By displaying and preserving your car, you can enjoy your work of art for years to come. Consider different display options for a truly customized look. Enjoy the time you spent to build your diecast car.
Conclusion
Building a diecast car is a rewarding hobby that allows you to combine creativity with craftsmanship. By following these steps and using the right tools, you can create unique and personalized model cars that you can be proud of. From selecting the model to adding the finishing touches, each step offers an opportunity for creativity and customization. With patience and practice, you can transform a simple diecast model into a stunning work of art. So gather your tools, find a comfortable workspace, and start building your own custom diecast car today. Enjoy the process!